Appearance
笔记本
Notebook API 允许 Visual Studio Code 插件将文件作为笔记本(notebook)打开、执行笔记本的代码单元格,并以各种丰富、交互的格式渲染笔记本的输出。你可能熟悉 Jupyter Notebook 或 Google Colab 这类流行的笔记本界面——Notebook API 让 Visual Studio Code 也能提供类似的体验。
笔记本的组成部分
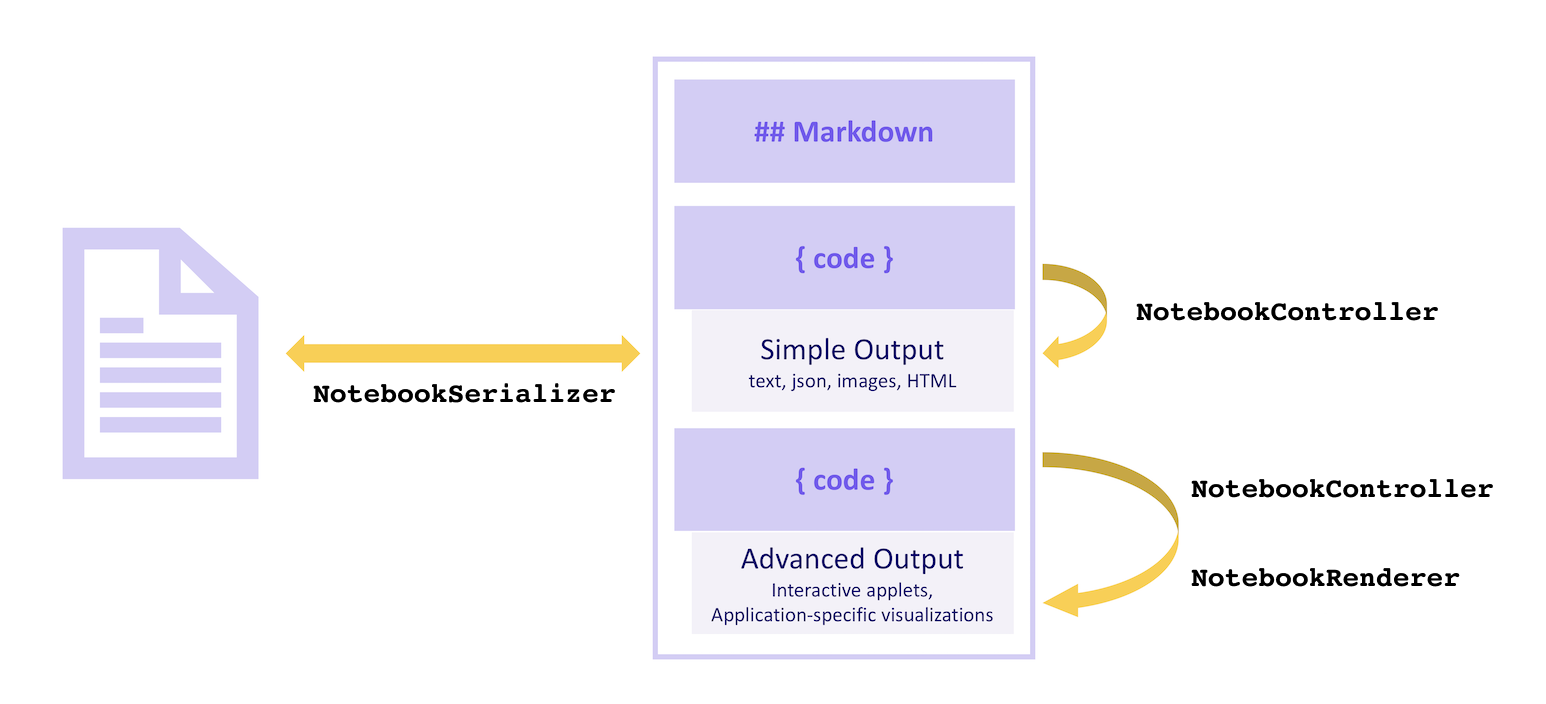
笔记本由一系列单元格及其输出组成。笔记本的单元格可以是Markdown 单元格或代码单元格,并在 VS Code 的核心中渲染。输出的格式多种多样。部分输出格式(如纯文本、JSON、图片和 HTML)由 VS Code 核心渲染,其他格式(如特定于应用的数据或交互式小程序)则由插件渲染。
笔记本中的单元格由 NotebookSerializer 负责从文件系统读写:它负责从文件系统读取数据并转换为单元格的描述,同时将笔记本的修改持久化回文件系统。笔记本的代码单元格可以由 NotebookController 执行,它接收单元格的内容并从中产生零个或多个输出,格式从纯文本到格式化文档或交互式小程序不等。特定于应用的输出格式和交互式小程序的输出由 NotebookRenderer 渲染。
直观地看:
序列化器(Serializer)
NotebookSerializer 负责接收笔记本的序列化字节,并将这些字节反序列化为 NotebookData(其中包含 Markdown 单元格和代码单元格的列表)。它也负责相反的转换:将 NotebookData 转换回需要保存的序列化字节。
示例:
- JSON Notebook Serializer:简单的示例笔记本,接收 JSON 输入并在自定义的
NotebookRenderer中输出美化后的 JSON。 - Markdown Serializer:将 Markdown 文件作为笔记本打开和编辑。
示例
在这个示例中,我们构建一个简化的笔记本提供者插件,用于查看 Jupyter Notebook 格式 且带有 .notebook 扩展名(而不是其传统的 .ipynb 文件扩展名)的文件。
笔记本序列化器在 package.json 的 contributes.notebooks 部分中声明,如下所示:
json
{
    ...
    "contributes": {
        ...
        "notebooks": [
            {
                "type": "my-notebook",
                "displayName": "My Notebook",
                "selector": [
                    {
                        "filenamePattern": "*.notebook"
                    }
                ]
            }
        ]
    }
}然后,在插件的激活事件激活事件用于激活插件的VS Code事件钩子。中注册笔记本序列化器:
ts
import { TextDecoder, TextEncoder } from "util";
import * as vscode from 'vscode';

export function activate(context: vscode.ExtensionContext) {
    context.subscriptions.push(
        vscode.workspace.registerNotebookSerializer(
            "my-notebook", new SampleSerializer()
        )
    );
}

interface RawNotebook {
	cells: RawNotebookCell[];
}

interface RawNotebookCell {
    source: string[];
    cell_type: 'code' | 'markdown';
}

class SampleSerializer implements vscode.NotebookSerializer {
    async deserializeNotebook(content: Uint8Array, _token: vscode.CancellationToken): Promise<vscode.NotebookData> {
        var contents = new TextDecoder().decode(content);

        let raw: RawNotebookCell[];
        try {
            raw = (<RawNotebook>JSON.parse(contents)).cells;
        } catch {
            raw = [];
        }

        const cells = raw.map(item => new vscode.NotebookCellData(
			item.cell_type === 'code' ? vscode.NotebookCellKind.Code : vscode.NotebookCellKind.Markup,
            item.source.join('\n'),
			item.cell_type === 'code' ? 'python' : 'markdown'
        ));

        return new vscode.NotebookData(cells);
    }

    async serializeNotebook(data: vscode.NotebookData, _token: vscode.CancellationToken): Promise<Uint8Array> {
        let contents: RawNotebookCell[] = [];

        for (const cell of data.cells) {
            contents.push({
                cell_type: cell.kind === vscode.NotebookCellKind.Code ? 'code' : 'markdown',
                source: cell.value.split(/\r?\n/g)
            });
        }

        return new TextEncoder().encode(JSON.stringify(contents));
    }
}
现在试着运行你的插件,并打开一个以 .notebook 扩展名保存的 Jupyter Notebook 格式文件:
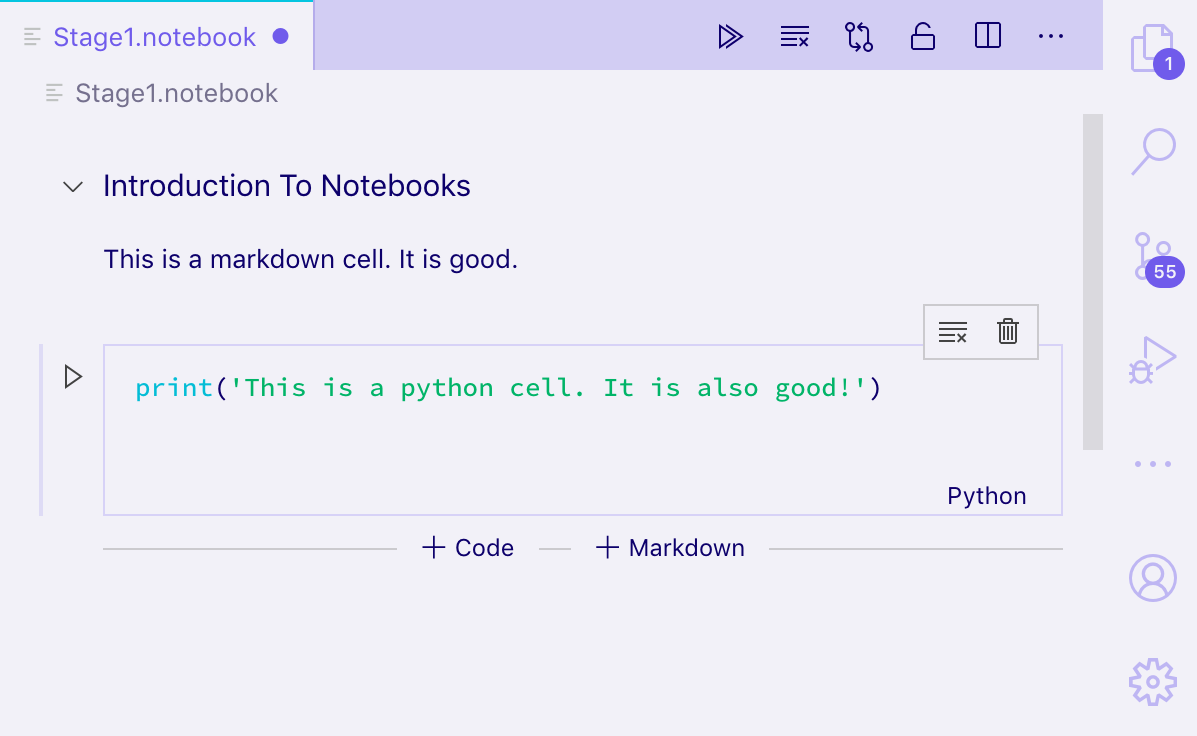
你应该能够打开 Jupyter 格式的笔记本,并同时以纯文本和渲染后的 Markdown 查看其中的单元格,也可以编辑单元格。不过,输出不会被持久化到磁盘;要保存输出,你还需要对 NotebookData 中单元格的输出进行序列化和反序列化。
要运行单元格,你需要实现一个 NotebookController。
控制器(Controller)
NotebookController 负责接收代码单元格并执行其中的代码,以产生一些输出或没有输出。
控制器在创建时通过设置 NotebookController#notebookType 属性,直接与某个笔记本序列化器和某种笔记本类型关联。然后,在插件激活时,通过将控制器推入插件的订阅列表来全局注册该控制器。
ts
export function activate(context: vscode.ExtensionContext) {
    context.subscriptions.push(new Controller());
}

class Controller {
    readonly controllerId = 'my-notebook-controller-id'
    readonly notebookType = 'my-notebook';
    readonly label = 'My Notebook';
    readonly supportedLanguages = ['python'];

    private readonly _controller: vscode.NotebookController;
    private _executionOrder = 0;

    constructor() {
        this._controller = vscode.notebooks.createNotebookController(this.controllerId, this.notebookType, this.label);

        this._controller.supportedLanguages = this.supportedLanguages;
        this._controller.supportsExecutionOrder = true;
        this._controller.executeHandler = this._execute.bind(this);
    }

    private _execute(cells: vscode.NotebookCell[], _notebook: vscode.NotebookDocument, _controller: vscode.NotebookController): void {
        for (let cell of cells) {
            this._doExecution(cell);
        }
    }

    private async _doExecution(cell: vscode.NotebookCell): Promise<void> {
        const execution = this._controller.createNotebookCellExecution(cell);
        execution.executionOrder = ++this._executionOrder;
        execution.start(Date.now()); // Keep track of elapsed time to execute cell.

        /* Do some execution here; not implemented */

        execution.replaceOutput([new vscode.NotebookCellOutput([vscode.NotebookCellOutputItem.text('Dummy output text!')])])
        execution.end(true, Date.now());
    }
}
如果你将提供 NotebookController 的插件与其序列化器分开发布,请在插件的 package.json 的 keywords 中添加类似 notebookKernel<ViewTypeUpperCamelCased> 的条目。例如,如果你为 github-issues 笔记本类型发布了一个替代内核,你应该在插件中添加 notebookKernelGithubIssues 关键字。 这样,在 Visual Studio Code 中打开 <ViewTypeUpperCamelCased> 类型的笔记本时,可以提高插件的可发现性。
示例:
- GitHub Issues Notebook:执行 GitHub Issues 查询的控制器。
- REST Book:运行 REST 查询的控制器。
- Regexper notebooks:可视化正则表达式的控制器。
输出类型
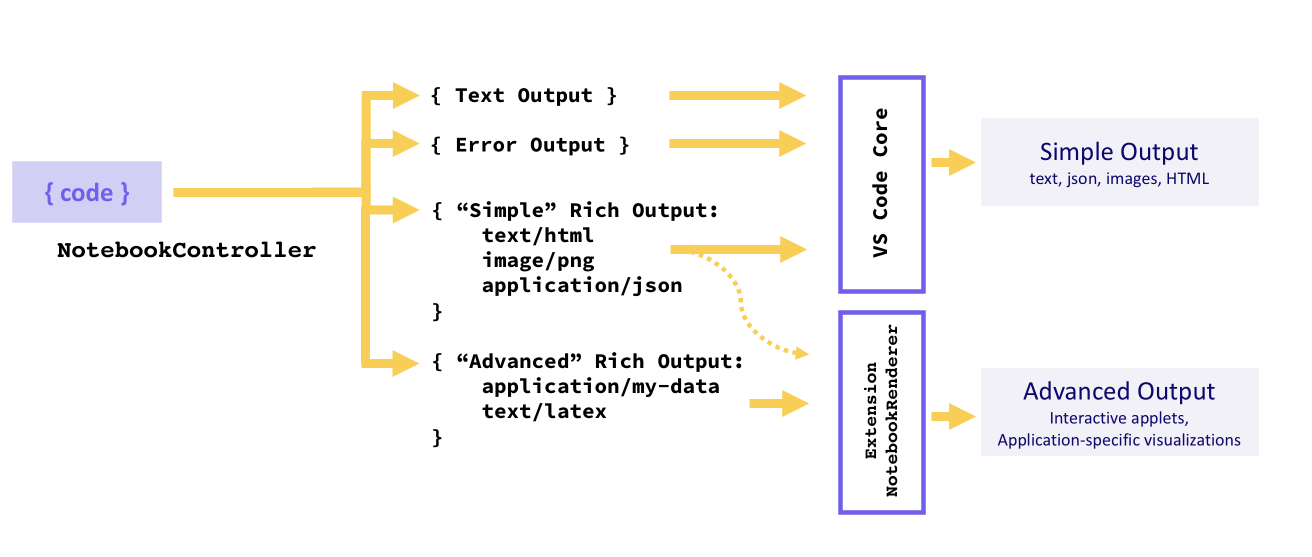
输出必须是以下三种格式之一:文本输出(Text Output)、错误输出(Error Output)或富文本输出(Rich Output)。内核可能为单次单元格执行提供多个输出,这种情况下它们会以列表的形式显示。
文本输出、错误输出等简单格式,以及富文本输出的“简单”变体(HTML、Markdown、JSON 等)由 VS Code 核心渲染,而特定于应用的富文本输出类型则由 NotebookRenderer 渲染。插件也可以选择自行渲染“简单”的富文本输出,例如为 Markdown 输出添加 LaTeX 支持。
文本输出
文本输出是最简单的输出格式,与许多你熟悉的 REPL 的工作方式类似。它们只包含一个 text 字段,在单元格的输出元素中以纯文本形式渲染:
ts
vscode.NotebookCellOutputItem.text('This is the output...')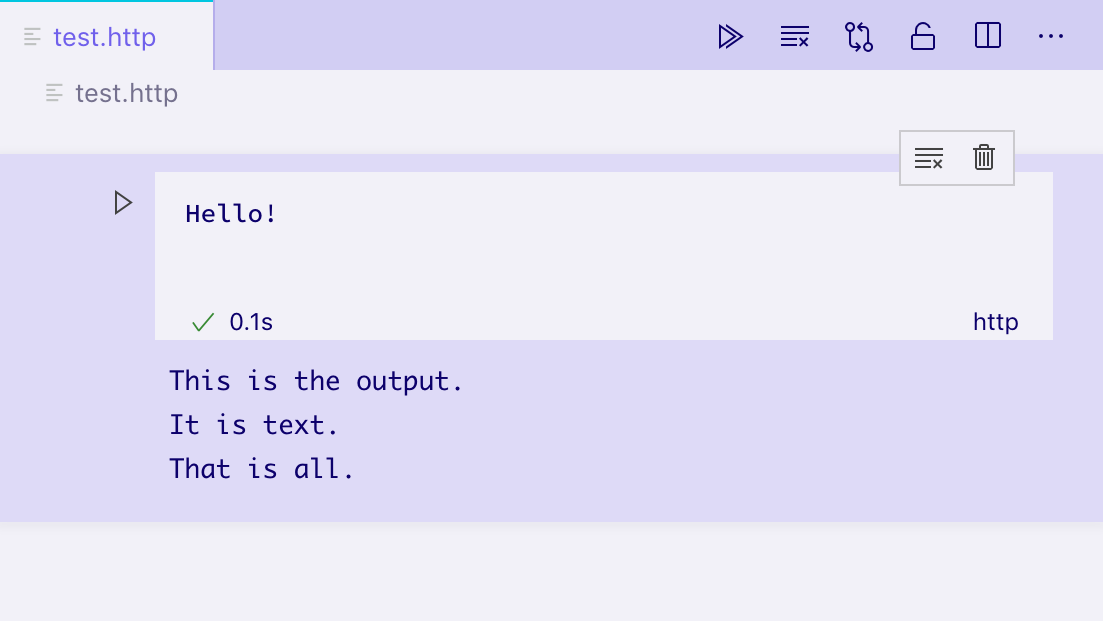
错误输出
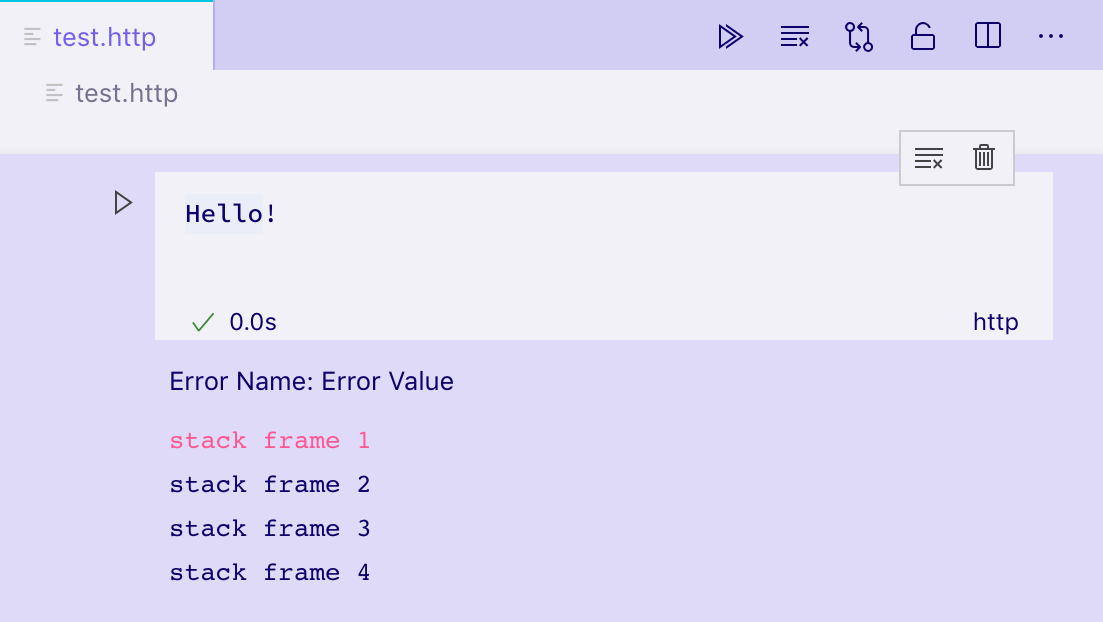
错误输出有助于以一致且易于理解的方式显示运行时错误。它们支持标准的 Error 对象。
ts
try {
    /* Some code */
} catch (error) {
    vscode.NotebookCellOutputItem.error(error)
}
富文本输出
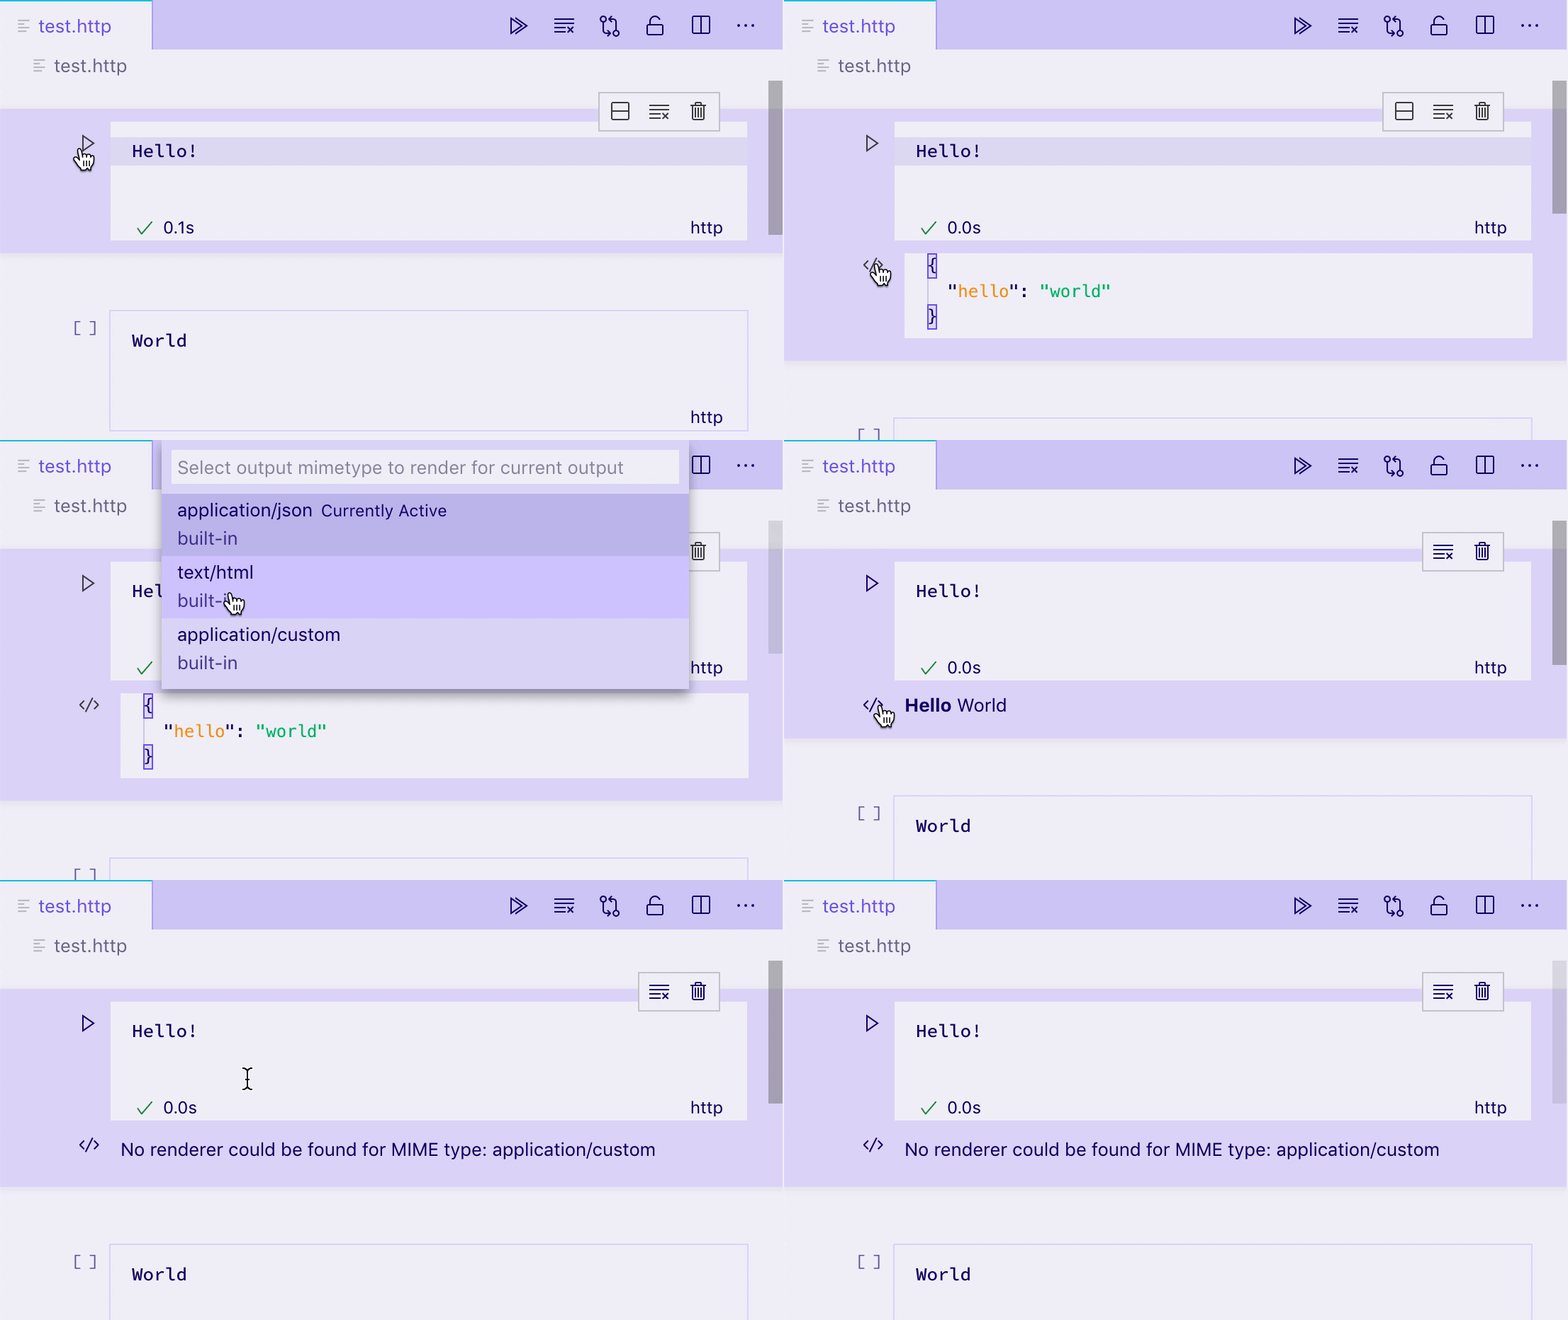
富文本输出是显示单元格输出的最先进形式。它们允许按 mimetype 提供输出数据的多种不同表示。例如,如果单元格输出要表示一个 GitHub Issue,内核可能会在 data 字段上生成带多个属性的富文本输出:
- 一个包含 issue 格式化视图的
text/html字段。 - 一个包含机器可读视图的
text/x-json字段。 - 一个
application/github-issue字段,NotebookRenderer可以用它来创建 issue 的完全交互式视图。
在这种情况下,text/html 和 text/x-json 视图将由 VS Code 原生渲染,但如果没有为 application/github-issue 这种 mimetype 注册 NotebookRenderer,则会显示错误。
ts
execution.replaceOutput([new vscode.NotebookCellOutput([
                            vscode.NotebookCellOutputItem.text('<b>Hello</b> World', 'text/html'),
                            vscode.NotebookCellOutputItem.json({ hello: 'world' }),
                            vscode.NotebookCellOutputItem.json({ custom-data-for-custom-renderer: 'data' }, 'application/custom'),
                        ])]);
默认情况下,VS Code 可以渲染以下 mimetype:
- application/javascript
- text/html
- image/svg+xml
- text/markdown
- image/png
- image/jpeg
- text/plain
VS Code 会在内置编辑器中将这些 mimetype 作为代码渲染:
- text/x-json
- text/x-javascript
- text/x-html
- text/x-rust
- ... text/x-LANGUAGE_ID for any other built-in or installed languages.
这个笔记本正在使用内置编辑器显示一些 Rust 代码: 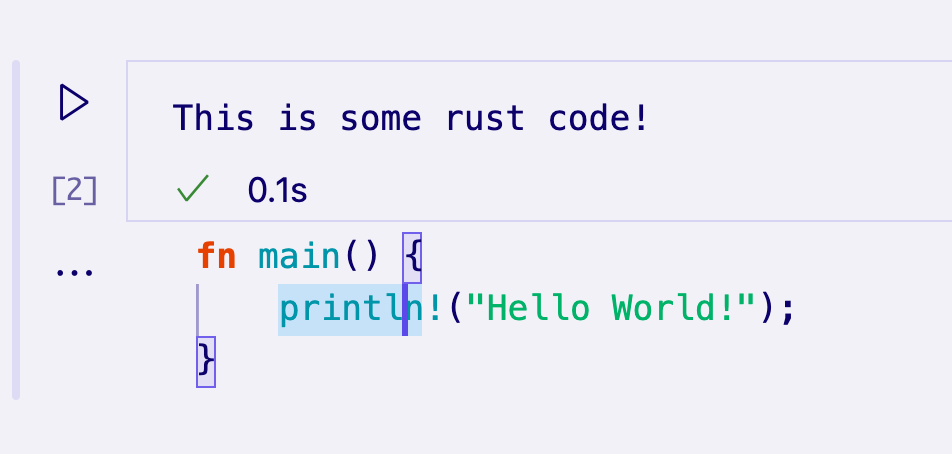
要渲染其他 mimetype,必须为该 mimetype 注册一个 NotebookRenderer。
Notebook 渲染器(Notebook Renderer)
笔记本渲染器负责接收特定 mimetype 的输出数据,并提供该数据的渲染视图。被输出单元格共享的渲染器可以在这些单元格之间维护全局状态。渲染视图的复杂度可以从简单的静态 HTML 到动态的完全交互式小程序不等。在本节中,我们将探索渲染表示 GitHub Issue 的输出的各种技巧。
你可以使用 Yeoman 生成器的样板代码快速上手。为此,首先使用以下命令安装 Yeoman 和 VS Code 生成器:
bash
npm install -g yo generator-code然后,运行 yo code 并选择 New Notebook Renderer (TypeScript)。
如果你不使用这个模板,你只需要确保在插件的 package.json 的 keywords 中添加 notebookRenderer,并在插件名称或描述中提及它的 mimetype,以便用户能够找到你的渲染器。
一个简单的非交互式渲染器
渲染器通过为插件 package.json 的 contributes.notebookRenderer 属性配置条目,为一组 mimetype 声明。这个渲染器将处理 ms-vscode.github-issue-notebook/github-issue 格式的输入,我们假设某个已安装的控制器能够提供这种输入:
json
{
  "activationEvents": ["...."],
  "contributes": {
    ...
    "notebookRenderer": [
      {
        "id": "github-issue-renderer",
        "displayName": "GitHub Issue Renderer",
        "entrypoint": "./out/renderer.js",
        "mimeTypes": [
          "ms-vscode.github-issue-notebook/github-issue"
        ]
      }
    ]
  }
}
输出渲染器始终在单个 iframe 中渲染,与 VS Code 的其他 UI 隔离,以确保它们不会意外干扰或导致 VS Code 变慢。配置条目指向一个“入口点(entrypoint)”脚本,该脚本会在需要渲染任何输出之前加载到笔记本的 iframe 中。你的入口点必须是单个文件,你可以自己编写,也可以使用 Webpack、Rollup 或 Parcel 等打包器来生成。
加载后,你的入口点脚本应从 vscode-notebook-renderer 导出 ActivationFunction,以便在 VS Code 准备好渲染你的渲染器时渲染你的 UI。例如,下面的代码会将你的所有 GitHub issue 数据以 JSON 形式放入单元格输出:
js
import type { ActivationFunction } from 'vscode-notebook-renderer';

export const activate: ActivationFunction = (context) => ({
    renderOutputItem(data, element) {
        element.innerText = JSON.stringify(data.json())
    }
})你可以在此处参考完整的 API 定义。如果你使用 TypeScript,可以安装 @types/vscode-notebook-renderer,然后在 tsconfig.json 的 types 数组中添加 vscode-notebook-renderer,以使这些类型在你的代码中可用。
要创建更丰富的内容,你可以手动创建 DOM 元素,或使用 Preact 等框架并将其渲染到输出元素中,例如:
jsx
import type { ActivationFunction } from 'vscode-notebook-renderer';
import { h, render } from 'preact';

const Issue: FunctionComponent<{ issue: GithubIssue }> = ({ issue }) => (
  <div key={issue.number}>
    <h2>
      {issue.title}
      (<a href={`https://github.com/${issue.repo}/issues/${issue.number}`}>#{issue.number}</a>)
    </h2>
    <img src={issue.user.avatar_url} style={{ float: 'left', width: 32, borderRadius: '50%', marginRight: 20 }} />
    <i>@{issue.user.login}</i> Opened: <div style="margin-top: 10px">{issue.body}</div>
  </div>
);

const GithubIssues: FunctionComponent<{ issues: GithubIssue[]; }> = ({ issues }) => (
  <div>{issues.map(issue => <Issue key={issue.number} issue={issue} />)}</div>
);

export const activate: ActivationFunction = (context) => ({
    renderOutputItem(data, element) {
        render(<GithubIssues issues={data.json()} />, element);
    }
});
在带有 ms-vscode.github-issue-notebook/github-issue 数据字段的输出单元格上运行这个渲染器,会得到以下静态 HTML 视图:
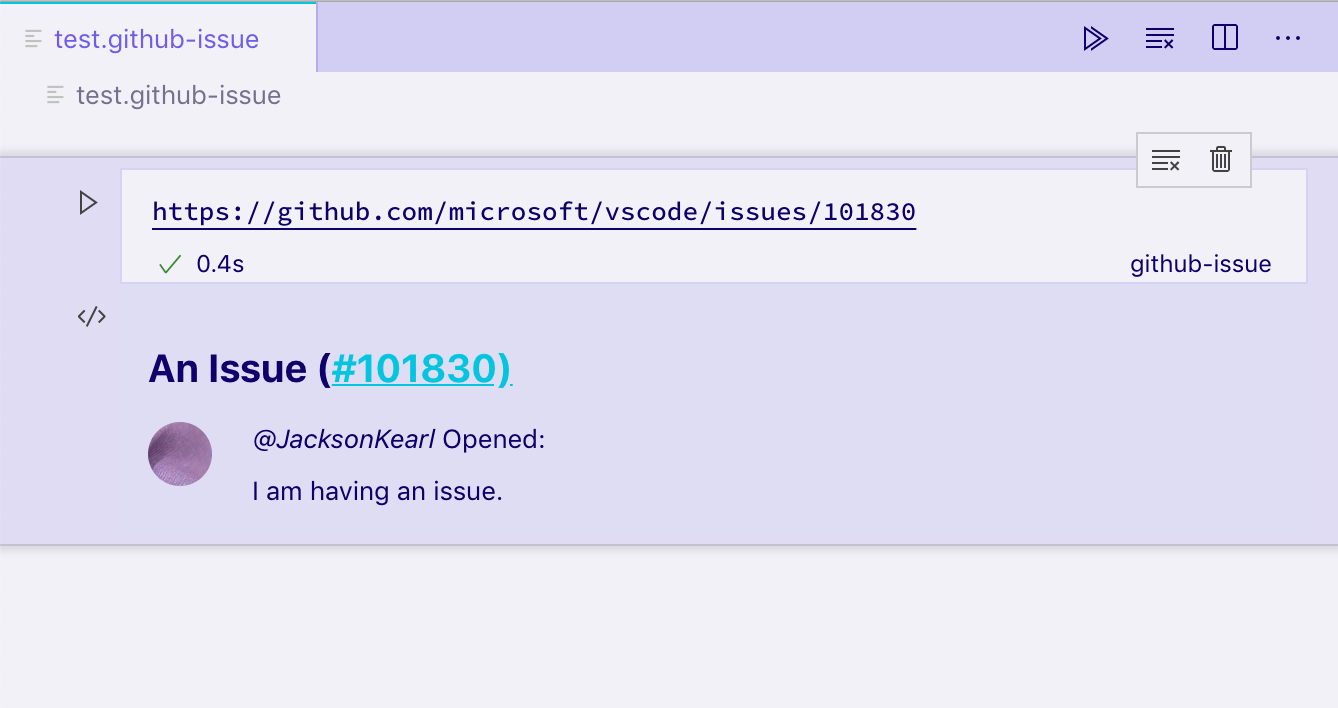
如果你有容器之外的元素或其他异步进程,可以使用 disposeOutputItem 来销毁它们。该事件会在输出被清除、单元格被删除时触发,也会在现有单元格渲染新输出之前触发。例如:
js
const intervals = new Map();

export const activate: ActivationFunction = (context) => ({
    renderOutputItem(data, element) {
        render(<GithubIssues issues={data.json()} />, element);

        intervals.set(data.mime, setInterval(() => {
            if(element.querySelector('h2')) {
                element.querySelector('h2')!.style.color = `hsl(${Math.random() * 360}, 100%, 50%)`;
            }
        }, 1000));
    },
    disposeOutputItem(id) {
        clearInterval(intervals.get(id));
        intervals.delete(id);
    }
});
务必牢记,笔记本的所有输出都渲染在同一个 iframe 中的不同元素里。如果你使用 document.querySelector 之类的函数,请确保将其限定在你关心的特定输出上,以避免与其他输出冲突。在这个示例中,我们使用 element.querySelector 来避免这个问题。
交互式笔记本(与控制器通信)
假设我们想在渲染输出的按钮被点击后,添加查看 issue 评论的功能。假设某个控制器可以在 ms-vscode.github-issue-notebook/github-issue-with-comments mimetype 下提供带评论的 issue 数据,我们可能会尝试提前获取所有评论,并如下实现:
jsx
const Issue: FunctionComponent<{ issue: GithubIssueWithComments }> = ({ issue }) => {
  const [showComments, setShowComments] = useState(false);

  return (
    <div key={issue.number}>
      <h2>
        {issue.title}
        (<a href={`https://github.com/${issue.repo}/issues/${issue.number}`}>#{issue.number}</a>)
      </h2>
      <img src={issue.user.avatar_url} style={{ float: 'left', width: 32, borderRadius: '50%', marginRight: 20 }} />
      <i>@{issue.user.login}</i> Opened: <div style="margin-top: 10px">{issue.body}</div>
      <button onClick={() => setShowComments(true)}>Show Comments</button>
      {showComments && issue.comments.map(comment => <div>{comment.text}</div>)}
    </div>
  );
};
这立即引发了一些问题。其一,即使在点击按钮之前,我们也在为所有 issue 加载完整的评论数据。此外,即使我们只是想多展示一点数据,却要求控制器支持一个完全不同的 mimetype。
相反,控制器可以通过包含一个预加载脚本(VS Code 也会在 iframe 中加载它)来为渲染器提供额外功能。这个脚本可以访问全局函数 postKernelMessage 和 onDidReceiveKernelMessage,用于与控制器通信。
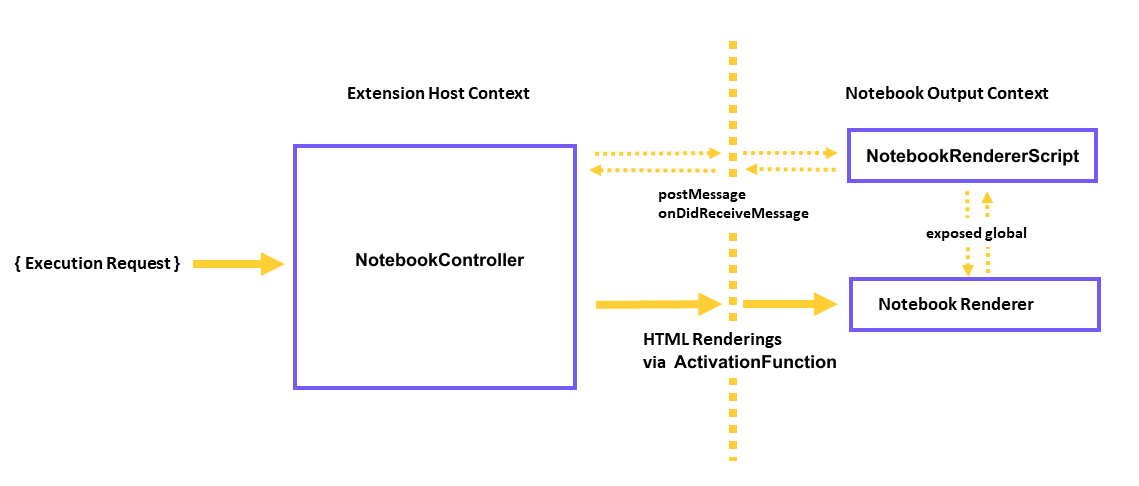
例如,你可以修改控制器的 rendererScripts,使其引用一个新文件,在其中创建回连插件主机(Extension Host)的连接,并为渲染器暴露一个全局通信脚本。
在你的控制器中:
ts
class Controller {
    // ...

    readonly rendererScriptId = 'my-renderer-script';

    constructor() {
        // ...

        this._controller.rendererScripts.push(new vscode.NotebookRendererScript(vscode.Uri.file(/* path to script */), rendererScriptId));
    }
}
在你的 package.json 中,将你的脚本指定为渲染器的依赖:
json
{
  "activationEvents": ["...."],
  "contributes": {
    ...
    "notebookRenderer": [
      {
        "id": "github-issue-renderer",
        "displayName": "GitHub Issue Renderer",
        "entrypoint": "./out/renderer.js",
        "mimeTypes": [...],
        "dependencies": [
            "my-renderer-script"
        ]
      }
    ]
  }
}
在你的脚本文件中,你可以声明与控制器通信的通信函数:
js
import "vscode-notebook-renderer/preload";

globalThis.githubIssueCommentProvider = {
  loadComments(issueId: string, callback: (comments: GithubComment[]) => void) {
    postKernelMessage({ command: 'comments', issueId });

    onDidReceiveKernelMessage(event => {
        if (event.data.type === 'comments' && event.data.issueId === issueId) {
            callback(event.data.comments);
        }
    })
  }
};
然后你可以在渲染器中消费它。你需要确保检查控制器渲染脚本暴露的全局变量是否可用,因为其他开发者可能会在其他笔记本和未实现 githubIssueCommentProvider 的控制器中创建 GitHub issue 输出。在这种情况下,只有当全局变量可用时,我们才显示 Load Comments 按钮:
jsx
const canLoadComments = globalThis.githubIssueCommentProvider !== undefined;
const Issue: FunctionComponent<{ issue: GithubIssue }> = ({ issue }) => {
  const [comments, setComments] = useState([]);
  const loadComments = () =>
    globalThis.githubIssueCommentProvider.loadComments(issue.id, setComments);

  return (
    <div key={issue.number}>
      <h2>
        {issue.title}
        (<a href={`https://github.com/${issue.repo}/issues/${issue.number}`}>#{issue.number}</a>)
      </h2>
      <img src={issue.user.avatar_url} style={{ float: 'left', width: 32, borderRadius: '50%', marginRight: 20 }} />
      <i>@{issue.user.login}</i> Opened: <div style="margin-top: 10px">{issue.body}</div>
      {canLoadComments && <button onClick={loadComments}>Load Comments</button>}
      {comments.map(comment => <div>{comment.text}</div>)}
    </div>
  );
};
最后,我们想要建立与控制器的通信。当渲染器使用全局 postKernelMessage 函数发布消息时,会调用 NotebookController.onDidReceiveMessage 方法。要实现此方法,请挂接 onDidReceiveMessage 来监听消息:
ts
class Controller {
    // ...

    constructor() {
        // ...

        this._controller.onDidReceiveMessage(event => {
            if (event.message.command === 'comments') {
                _getCommentsForIssue(event.message.issueId).then(comments => this._controller.postMessage({
                    type: 'comments',
                    issueId: event.message.issueId,
                    comments,
                }), event.editor);
            }
        })
    }
}
交互式笔记本(与插件主机通信)
假设我们想添加在独立编辑器中打开输出项的功能。要实现这一点,渲染器需要能够向插件主机发送消息,然后由插件主机启动编辑器。
这在渲染器和控制器是两个独立插件的场景中非常有用。
在渲染器插件的 package.json 中,将 requiresMessaging 的值指定为 optional,这允许你的渲染器在能够和不能访问插件主机两种情况下都能工作。
json
{
  "activationEvents": ["...."],
  "contributes": {
    ...
    "notebookRenderer": [
      {
        "id": "output-editor-renderer",
        "displayName": "Output Editor Renderer",
        "entrypoint": "./out/renderer.js",
        "mimeTypes": [...],
        "requiresMessaging": "optional"
      }
    ]
  }
}
requiresMessaging 的可能取值包括:
always:必须支持消息传递。渲染器只有在它属于可以在插件主机中运行的插件时才会被使用。optional:当插件主机可用时,渲染器有消息传递会更好,但安装和运行渲染器并非必需。never:渲染器不需要消息传递。
后两个选项是更推荐的,因为它们确保了渲染器插件在插件主机可能不可用的其他环境中的可移植性。
渲染器脚本文件可以如下建立通信:
js
import { ActivationFunction } from 'vscode-notebook-renderer';

export const activate: ActivationFunction = (context) => ({
  renderOutputItem(data, element) {
    // Render the output using the output `data`
    ....
    // The availability of messaging depends on the value in `requiresMessaging`
    if (!context.postMessage){
      return;
    }

    // Upon some user action in the output (such as clicking a button),
    // send a message to the extension host requesting the launch of the editor.
    document.querySelector('#openEditor').addEventListener('click', () => {
      context.postMessage({
        request: 'showEditor',
        data: '<custom data>'
      })
    });
  }
});
然后,你可以在插件主机中如下消费该消息:
ts
const messageChannel = notebooks.createRendererMessaging('output-editor-renderer');
messageChannel.onDidReceiveMessage((e) => {
  if (e.message.request === 'showEditor'){
    // Launch the editor for the output identified by `e.message.data`
  }
});
注意:
- 为确保插件在消息送达前已在插件主机中运行,请在
activationEvents中添加onRenderer:<your renderer id>,并在插件的activate函数中建立通信。 - 并不保证渲染器插件发送到插件主机的所有消息都能送达。用户可能在渲染器的消息送达之前关闭笔记本。
调试支持
对于某些控制器(例如实现编程语言的控制器),允许调试单元格的执行可能是理想的做法。要添加调试支持,笔记本内核可以实现调试适配器,要么直接实现调试适配器协议(DAP),要么将协议委托并转换为现有的笔记本调试器(如 'vscode-simple-jupyter-notebook' 示例中所做的那样)。一个更简单的方法是使用现有的未经修改的调试插件,并即时为笔记本的需求转换 DAP(如 'vscode-nodebook' 中所做的那样)。
示例:
- vscode-nodebook:Node.js 笔记本,调试支持由 VS Code 内置的 JavaScript 调试器和一些简单的协议转换提供。
- vscode-simple-jupyter-notebook:Jupyter 笔记本,调试支持由现有的 Xeus 调试器提供。