Appearance
教程:使用聊天 API 构建代码教学聊天参与者
本教程将介绍如何创建与 GitHub Copilot Chat 体验集成的 Visual Studio Code 插件。你将使用 Chat 插件 API 提供 Chat 参与者。该参与者是一个代码导师,可以为编程概念提供说明和示例练习。
先决条件
完成本教程需要以下工具和帐户:
第 1 步:设置项目
首先,使用 Yeoman 和 VS Code 插件生成器生成插件项目。
bash
npx --package yo --package generator-code -- yo code选择以下选项完成设置:
bash
# ? What type of extension do you want to create? New Extension (TypeScript)
# ? What's the name of your extension? Code Tutor

### Press <Enter> to choose default for all options below ###

# ? What's the identifier of your extension? code-tutor
# ? What's the description of your extension? LEAVE BLANK
# ? Initialize a git repository? Yes
# ? Bundle the source code with webpack? No
# ? Which package manager to use? npm

# ? Do you want to open the new folder with Visual Studio Code? Open with `code`插件项目生成后,需要使用两个文件:extension.ts 和 package.json。有关详细信息,请参阅插件结构文档。简要说明如下:
extension.ts是插件的主入口,包含 Chat 参与者的逻辑。package.json包含插件元数据,例如参与者的名称和说明。
删除 extension.ts 的 activate() 方法中自动生成的代码。你将在这里放置聊天参与者的逻辑。
第 2 步:注册聊天参与者
在 package.json 文件中,将自动生成的 contributes 部分替换为以下内容:
json
"contributes":{
    "chatParticipants": [
    {
        "id": "chat-tutorial.code-tutor",
        "fullName": "Code Tutor",
        "name": "tutor",
        "description": "What can I teach you?",
        "isSticky": true
    }
    ]
}
此代码注册具有以下属性的聊天参与者:
- 唯一 ID
chat-tutorial.code-tutor,将在代码中引用。 - 全名
Code Tutor,将显示在参与者响应的标题区域。 - 名称
tutor,用于在聊天视图中以@tutor引用聊天参与者。 - 说明“What can I teach you?”,将作为占位符显示在聊天输入框中。
最后,设置 isSticky: true 后,用户开始与参与者交互时,聊天输入框会自动预置参与者名称。
第 3 步:设计提示
参与者注册后,就可以开始实现代码导师逻辑。在 extension.ts 文件中,需要为请求定义提示。
设计良好的提示是从参与者获得最佳响应的关键。提示工程技巧请参阅这篇文章。
代码导师应模仿现实中的导师,通过引导学生理解概念而非直接提供答案。此外,导师应专注于主题,不回答与编程无关的问题。
请考虑以下两个提示,哪一个更可能产生指定行为?
You are a helpful code tutor. Your job is to teach the user with simple descriptions and sample code of the concept.
You are a helpful code tutor. Your job is to teach the user with simple descriptions and sample code of the concept. Respond with a guided overview of the concept in a series of messages. Do not give the user the answer directly, but guide them to find the answer themselves. If the user asks a non-programming question, politely decline to respond.
第二个提示更具体,可为参与者提供清晰的响应方向。请将此提示添加到 extension.ts 文件中。
ts
const BASE_PROMPT = 'You are a helpful code tutor. Your job is to teach the user with simple descriptions and sample code of the concept. Respond with a guided overview of the concept in a series of messages. Do not give the user the answer directly, but guide them to find the answer themselves. If the user asks a non-programming question, politely decline to respond.';第 4 步:实现请求处理程序
选择提示后,需要实现请求处理程序。它将处理用户的聊天请求。你将定义请求处理程序、执行处理请求的逻辑,并向用户返回响应。
首先,定义处理程序:
ts
// define a chat handler
const handler: vscode.ChatRequestHandler = async (request: vscode.ChatRequest, context: vscode.ChatContext, stream: vscode.ChatResponseStream, token: vscode.CancellationToken) => {

    return;
}
在处理程序主体中,使用提示初始化提示和 messages 数组,然后传入用户在聊天框中输入的内容。可以通过 request.prompt 访问该内容。
使用 request.model.sendRequest 发送请求,它会使用当前选中的模型发送请求。最后,将响应流式传输给用户。
ts
// define a chat handler
const handler: vscode.ChatRequestHandler = async (request: vscode.ChatRequest, context: vscode.ChatContext, stream: vscode.ChatResponseStream, token: vscode.CancellationToken) => {

    // initialize the prompt
    let prompt = BASE_PROMPT;

    // initialize the messages array with the prompt
    const messages = [
        vscode.LanguageModelChatMessage.User(prompt),
    ];

    // add in the user's message
    messages.push(vscode.LanguageModelChatMessage.User(request.prompt));

    // send the request
    const chatResponse = await request.model.sendRequest(messages, {}, token);

    // stream the response
    for await (const fragment of chatResponse.text) {
        stream.markdown(fragment);
    }

    return;
};
第 5 步:创建聊天参与者
实现处理程序后,最后一步是使用 Chat 插件 API 中的 createChatParticipant 方法创建 Chat 参与者。请确保使用与 package.json 中相同的 ID。
还应为参与者添加图标进行进一步自定义。与参与者交互时,图标将显示在 Chat 视图中。
ts
// define a chat handler
const handler: vscode.ChatRequestHandler = async (request: vscode.ChatRequest, context: vscode.ChatContext, stream: vscode.ChatResponseStream, token: vscode.CancellationToken) => {

    // initialize the prompt
    let prompt = BASE_PROMPT;

    // initialize the messages array with the prompt
    const messages = [
        vscode.LanguageModelChatMessage.User(prompt),
    ];

    // add in the user's message
    messages.push(vscode.LanguageModelChatMessage.User(request.prompt));

    // send the request
    const chatResponse = await request.model.sendRequest(messages, {}, token);

    // stream the response
    for await (const fragment of chatResponse.text) {
        stream.markdown(fragment);
    }

    return;
};

// create participant
const tutor = vscode.chat.createChatParticipant("chat-tutorial.code-tutor", handler);

// add icon to participant
tutor.iconPath = vscode.Uri.joinPath(context.extensionUri, 'tutor.jpeg');
第 6 步:运行代码
现在可以试用聊天参与者了! 按 kbstyle(F5) 运行代码。将打开包含聊天参与者的新 VS Code 窗口。
现在可在 Copilot 聊天窗格中输入 @tutor 调用参与者!
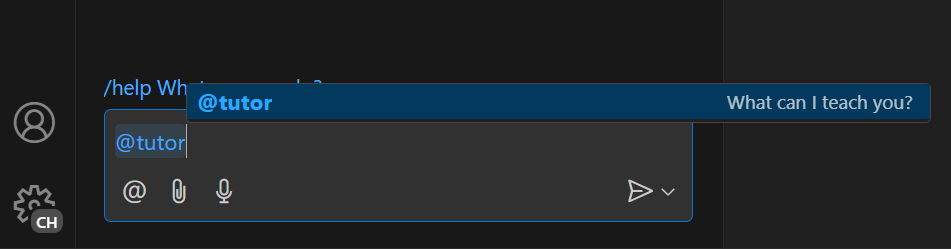
输入想要学习的主题来试用它。你应会看到概述该概念的响应!
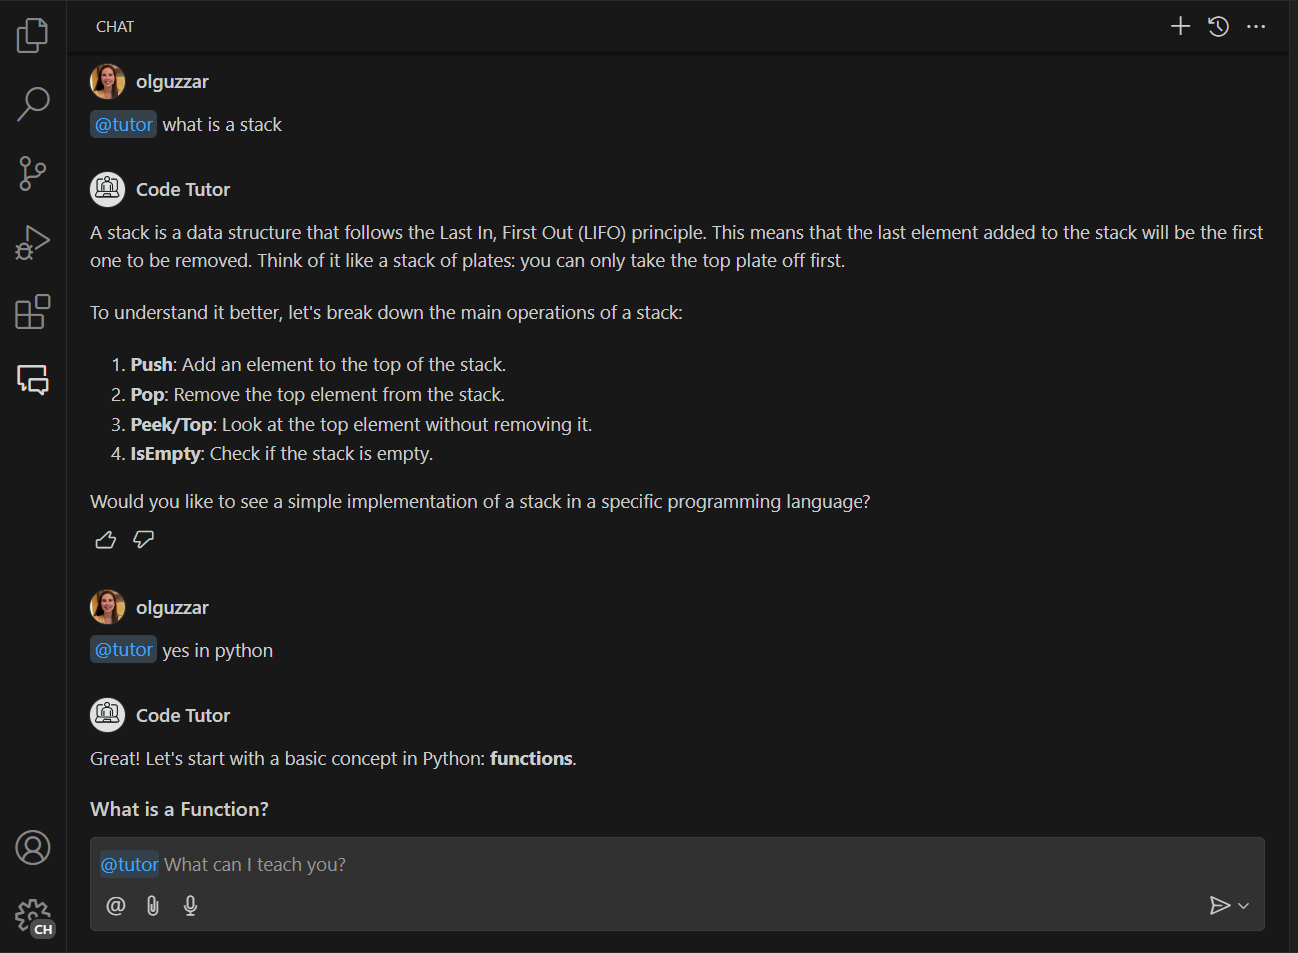
如果输入相关消息继续会话,会发现参与者不会基于会话提供后续响应。这是因为当前参与者仅发送用户的当前消息,而未发送参与者消息历史。
在下图中,导师正确地给出了栈的入门说明。但在后续问题中,它并未理解用户想继续查看 Python 中的栈实现,因此给出了关于 Python 的通用响应。
第 7 步:添加消息历史以提供更多上下文
Copilot 聊天的一大价值是可以围绕多条消息迭代,以获得最佳响应。为此,需要将参与者的消息历史传入聊天请求。可通过 context.history 访问历史记录。
需要检索该历史记录并将其添加到 messages 数组,且必须在添加 request.prompt 之前完成。
ts
// define a chat handler
const handler: vscode.ChatRequestHandler = async (request: vscode.ChatRequest, context: vscode.ChatContext, stream: vscode.ChatResponseStream, token: vscode.CancellationToken) => {

    // initialize the prompt
    let prompt = BASE_PROMPT;

    // initialize the messages array with the prompt
    const messages = [
        vscode.LanguageModelChatMessage.User(prompt),
    ];

    // get all the previous participant messages
    const previousMessages = context.history.filter(
        (h) => h instanceof vscode.ChatResponseTurn
    );

    // add the previous messages to the messages array
    previousMessages.forEach((m) => {
        let fullMessage = '';
        m.response.forEach((r) => {
            const mdPart = r as vscode.ChatResponseMarkdownPart;
            fullMessage += mdPart.value.value;
        });
        messages.push(vscode.LanguageModelChatMessage.Assistant(fullMessage));
    });

    // add in the user's message
    messages.push(vscode.LanguageModelChatMessage.User(request.prompt));

    // send the request
    const chatResponse = await request.model.sendRequest(messages, {}, token);

    // stream the response
    for await (const fragment of chatResponse.text) {
        stream.markdown(fragment);
    }

    return;
};
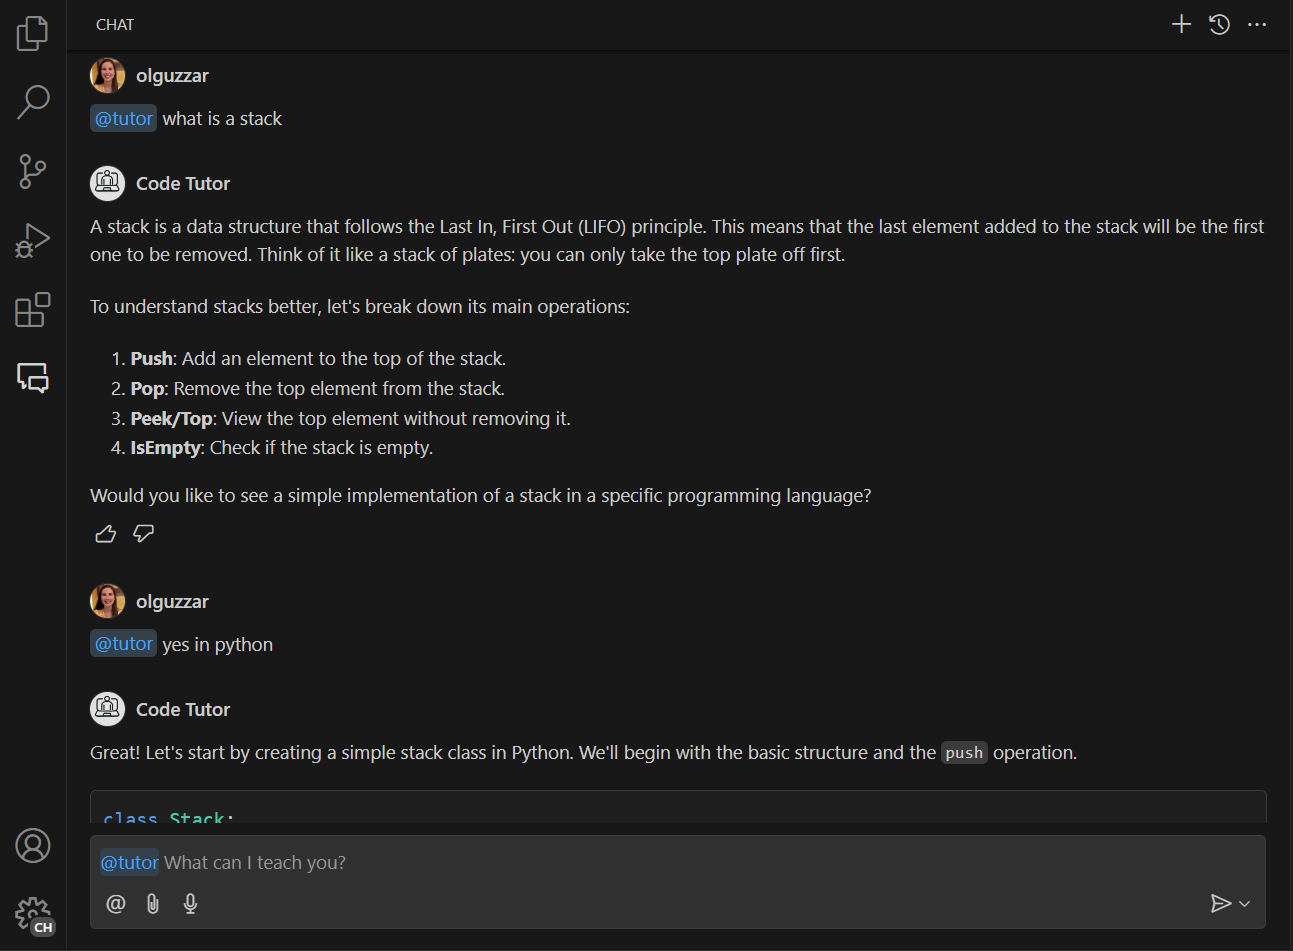
现在运行代码后,就可以带着此前消息的全部上下文与参与者对话!在下图中,参与者正确理解了用户希望查看 Python 中的栈实现。
第 8 步:添加命令
基本参与者实现后,可以通过添加命令来扩展它。命令是常见用户意图的简写,以 / 符号表示。插件随后可使用该命令对语言模型进行相应提示。
可以添加一个命令,提示导师为某个概念提供练习。需要在 package.json 文件中注册该命令,并在 extension.ts 中实现逻辑。可以将命令命名为 exercise,以便输入 /exercise 调用它。
在 package.json 中向 chatParticipants 属性添加 commands 属性。在此指定命令名称和简短说明:
json
"contributes": {
    "chatParticipants": [
      {
        "id": "chat-tutorial.code-tutor",
        "fullName": "Code Tutor",
        "name": "tutor",
        "description": "What can I teach you?",
        "isSticky": true,
        "commands": [
          {
            "name": "exercise",
            "description": "Provide exercises to practice a concept."
          }
        ]
      }
    ]
  },
要实现从导师获取示例练习的逻辑,最简单的方法是更改请求中发送的提示。创建一个新提示 EXERCISES_PROMPT,要求参与者返回示例练习。示例如下:
ts
const EXERCISES_PROMPT = 'You are a helpful tutor. Your job is to teach the user with fun, simple exercises that they can complete in the editor. Your exercises should start simple and get more complex as the user progresses. Move one concept at a time, and do not move on to the next concept until the user provides the correct answer. Give hints in your exercises to help the user learn. If the user is stuck, you can provide the answer and explain why it is the answer. If the user asks a non-programming question, politely decline to respond.';接下来,需要在请求处理程序中添加逻辑,以检测用户是否引用了该命令。可以通过 request.command 属性完成。
如果引用了命令,请将提示更新为新建的 EXERCISES_PROMPT。
ts
// define a chat handler
const handler: vscode.ChatRequestHandler = async (request: vscode.ChatRequest, context: vscode.ChatContext, stream: vscode.ChatResponseStream, token: vscode.CancellationToken) => {

    // initialize the prompt
    let prompt = BASE_PROMPT;

    if (request.command === 'exercise') {
        prompt = EXERCISES_PROMPT;
    }

    // initialize the messages array with the prompt
    const messages = [
        vscode.LanguageModelChatMessage.User(prompt),
    ];

    // get all the previous participant messages
    const previousMessages = context.history.filter(
        (h) => h instanceof vscode.ChatResponseTurn
    );

    // add the previous messages to the messages array
    previousMessages.forEach((m) => {
        let fullMessage = '';
        m.response.forEach((r) => {
            const mdPart = r as vscode.ChatResponseMarkdownPart;
            fullMessage += mdPart.value.value;
        });
        messages.push(vscode.LanguageModelChatMessage.Assistant(fullMessage));
    });

    // add in the user's message
    messages.push(vscode.LanguageModelChatMessage.User(request.prompt));

    // send the request
    const chatResponse = await request.model.sendRequest(messages, {}, token);

    // stream the response
    for await (const fragment of chatResponse.text) {
        stream.markdown(fragment);
    }

    return;
};
需要添加的内容就是这些。获取消息历史、发送请求和流式传输请求的其余逻辑均保持不变。
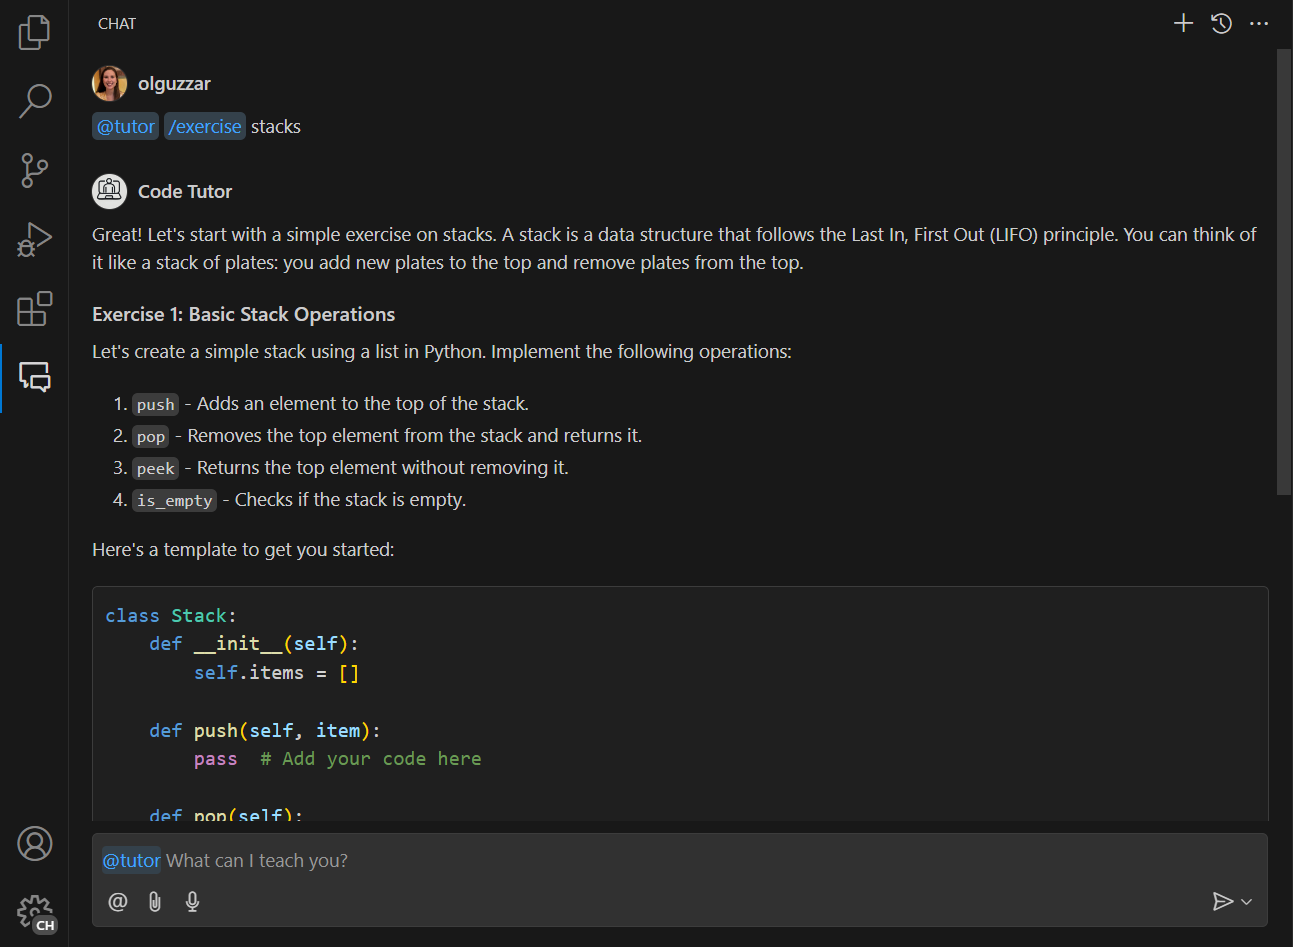
现在可以输入 /exercise,这会唤起聊天参与者,你可以获得用于练习编码的交互式练习!
后续步骤
恭喜!你已成功创建可为编程概念提供说明和示例练习的 Chat 参与者。可以通过微调提示、添加更多斜杠命令,或利用语言模型 API等其他 API,进一步扩展参与者。准备就绪后,也可以将插件发布到 Visual Studio Code Marketplace。
可在 vscode-extensions-sample 仓库中找到本教程的完整源代码。